
10 Tips on Painting Kitchen Cabinets
Kitchen cabinets are one of the easiest and most cost-efficient upgrades to make. Adding a fresh coat of paint to your cabinets can transform an outdated kitchen. Painting kitchen cabinets is a simple fix that enhances both style and function in the home.
Of all the rooms within your home, the kitchen offers the biggest return on investment. If there’s only one room you can renovate, experts in real estate and home design recommend that it’s the kitchen.
Follow these 10 kitchen cabinet painting steps to get professional-looking results.
1. Set up a Workstation
A designated workstation will make it much easier to prep kitchen cabinets for painting. It helps to have ample space to sand, paint, and give cabinets time to dry.
You can set up shop in a garage, basement, or spare bedroom. Make sure the area is well cleaned and dust-free. Dust and pet dander will stick to wet paint and show up on your cabinets.
Set up a work table to allow you to paint doors and let them dry. You can use standoffs for extra support. Make your own using small pieces of wood with screws sticking out of the top. This way, you can paint the entire door without having to wait for one side to dry.
Be sure to prep your kitchen workspace, too. Use painter’s tape to protect walls and counters near your cabinets. You’ll also want to cover countertops with brown builder’s paper to protect them. Unless you plan to buy new countertops to complete your upgraded kitchen design.
2. Pick the Right Paint
Choosing the right paint is one of the most important kitchen cabinet painting steps. Not all paints are created equal, and the best choice will depend on your goals, budget, and cabinet condition. Here are the most common paint types and when to use them:
- Water-Based Paint
- Benefits: Smooth finish, quick drying, and low odor.
- Best Use: Kitchen cabinet painting projects where you want a durable and easy-to-clean finish.
- Oil-Based Paint
- Benefits: Easy to clean with a long-lasting, hard finish that resists scratches.
- Best Use: High-traffic kitchens that get heavy daily use. Keep in mind that it has strong fumes and longer drying times.
- Gloss or Semi-Gloss Paint
- Benefits: Increased brightness in your kitchen due to the high shine. Easy to wipe down and keep clean.
- Best Use: Families with kids or cooks who want cabinets that are simple to maintain.
- Milk Paint
- Benefits: Unique texture, eco-friendly, and bonds well to unfinished wood.
- Best Use: Rustic or vintage-style kitchens where you want character and a slightly distressed look.
- Chalk Paint
- Benefits: Minimal prep work, easy application, and cost-effective.
- Best Use: DIY projects where speed and ease of use are most important.
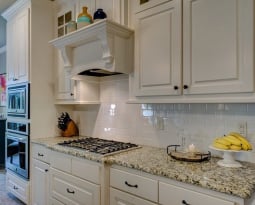
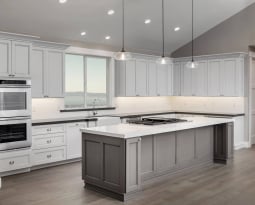
Choice of color also makes a huge difference when painting your kitchen cabinets. Updating to more neutral shades can increase the value of your home. Lighter colors will make your kitchen space seem larger, while darker shades tend not to work as well in smaller kitchens. See our blog on how to choose the best cabinet color for your kitchen.
3. Remove All Hardware and Doors
This can be the most tedious task when repainting kitchen cabinets, but it’s worth it. Remove all doors and hardware so it’s easier to paint the entire surface.
Use an electric screwdriver to remove all handles and hinges. Then take off cabinet doors and drawer fronts. It’s important to label everything beforehand to make reassembly easier. Put hardware and screws in small plastic bags so you don’t lose anything.
4. Prep Your Kitchen for Painting
Prep work is the most important step in how to paint kitchen cabinets the right way. You’ll want to give each cabinet a deep cleaning. This will remove cooking grease so the fresh paint can adhere better.
If cabinets are not too dirty, you can use Dawn dish soap with warm water. Tougher jobs call for TSP, a trisodium phosphate cleaning agent. It contains harsh chemicals, so use gloves to protect your hands. Also, be sure to rinse the cabinets afterward and wipe them dry.
5. Sand Them Down
Your cabinets will need a light sanding to help the paint stick. Some cabinets also have a sheen or clear coating on them that must be sanded first.
All you need is a light sanding using a 120-grit paper or sponge. Be sure to remove all sanding dust afterward. A vacuum brush attachment makes cleanup quick and easy, followed by a tack cloth to remove any remaining dust.
6. Apply a Coat of Primer
Most paint jobs will need a coat of primer first. If your old cabinets are a dark or vibrant color, you’ll have to prime them before painting. Priming will also seal in any oil from the cabinet wood.
Use a fast-drying brand for quick results so you can move on to repainting your kitchen cabinets. Once dry, go over with a light sanding paper in 220-grit and remove the dust with a tack cloth.
7. Now You’re Ready to Paint
A roller brush is an easy tool for applying your first coat of paint. Check your local hardware store for rollers made specifically for painting kitchen cabinets.
Follow a V pattern to spread the paint evenly, then roll back over in an up-and-down motion until you have a smooth surface. If your cabinets have detailed designs, you may need a small brush. Or you can use a paint sprayer for faster results.
When painting, start with the back of the cabinet, then the edges, and save the front for last. Allow plenty of drying time before applying a second coat.
8. Consider a Top Coat
This will depend on the type of paint you used. Some paints call for a special clear coat that goes over your paint. This can add sheen and protect the paint from chipping after years of use.
A polyurethane finish is a popular choice, as it dries clear and is available in both low and high-gloss options.
9. Reassemble Your Kitchen Cabinets
This step is easy as long as you keep everything labeled throughout the entire process. You may want to upgrade your hardware for a fresh new look. Just note that new hardware may not line up with old holes, so fill them with putty before painting your kitchen cabinets.
10. Enhance Other Elements of Your Kitchen Design
With freshly painted cabinets, your entire space will feel transformed. It turns an outdated design into something creative and clean.
To take your remodel further and enhance your kitchen design, consider adding new countertops, a beautiful backsplash, or updated flooring.
Your Kitchen Transformation: Painting Kitchen Cabinets or Buying New?
While painting kitchen cabinets is an affordable upgrade, it’s not for everyone. The process takes time, careful prep, and attention to detail.
If your kitchen cabinets are worn and damaged, a fresh coat of paint may not be enough to hide the flaws. Even with proper prep, paint can chip or fade over time. In those cases, it might be worth exploring kitchen cabinet replacement as a part of your overall redesign.
Most homeowners start by learning how to paint kitchen cabinets as an immediate upgrade and later move on to new cabinetry when the time and budget are right. Learn more about kitchen cabinet redesigns that will give your space an entirely new look and feel.

